Quantcast
Channel: Jordansphere
Viewing all 229 articles
Browse latest View live

Configure NTP Client on Rocky 8

$
0
0

The following quick-guide describes how to install and configure NTP Client on a Rocky or CentOS 8 OS.

Check to see if Chrony is already installed

dnf list chrony

If it is not installed run:

dnf install chronyd

Edit Chrony config file

vi /etc/chrony.conf

Replace pool 2.pool.ntp.org iburst with your desired NTP server eg (pool uk.pool.ntp.org)

Restart chronyd service

systemctl restart chronyd

You will also need to enable it if not already:

systemctl enable chronyd

Check new NTP server is being picked up:

chronyc sources

Change Timezone in Rocky 8

$
0
0

The following quick guide will show how to change the timezone. In this example my Rocky * machine is set to America/New York but I need to change it to Europe/London.

Confirm current timezone

ls -l /etc/localtime

My output showed:

lrwxrwxrwx. 1 root root 38 Oct 18 05:40 /etc/localtime -> ../usr/share/zoneinfo/America/New_York

To list all timezones

timedatectl list-timezones

Once you have confirmed the timezone you want run the following command (in my case Europe/London)

timedatectl set-timezone Europe/London

Run timedatectl command to confirm this has changed

timedatectl 

Output

Local time: Mon 2021-10-18 11:56:41 BST        
Universal time: Mon 2021-10-18 10:56:41 UTC              
RTC time: Mon 2021-10-18 10:56:41             
Time zone: Europe/London (BST, +0100)
 System clock synchronized: yes
               NTP service: active
           RTC in local TZ: no

Extend GPT iSCSI volume in Rocky 8

$
0
0

In this example I will be extending an XFS based iSCSI volume called Veeam_Repo_01 from 40TB to 55TB

Firstly in the back end storage increase the volume

On Rocky – Recan the initiator.

iscsiadm -m session --rescan

lsblk

Output:

sdc 8:32 0 55T 0 disk
└─Veeam_Repo_01 253:3 0 40T 0 mpath
└─Veeam_Repo_01p1 253:4 0 36.4T 0 part /BACKUP
sdd 8:48 0 55T 0 disk
└─Veeam_Repo_01 253:3 0 40T 0 mpath
└─Veeam_Repo_01p1 253:4 0 36.4T 0 part /BACKUP
sde 8:64 0 55T 0 disk
└─Veeam_Repo_01 253:3 0 40T 0 mpath
└─Veeam_Repo_01p1 253:4 0 36.4T 0 part /BACKUP
sdf 8:80 0 55T 0 disk
└─Veeam_Repo_01 253:3 0 40T 0 mpath
└─Veeam_Repo_01p1 253:4 0 36.4T 0 part /BACKUP
sdg 8:96 0 55T 0 disk
└─Veeam_Repo_01 253:3 0 40T 0 mpath
└─Veeam_Repo_01p1 253:4 0 36.4T 0 part /BACKUP
sdh 8:112 0 55T 0 disk
└─Veeam_Repo_01 253:3 0 40T 0 mpath
└─Veeam_Repo_01p1 253:4 0 36.4T 0 part /BACKUP
sdi 8:128 0 55T 0 disk
└─Veeam_Repo_01 253:3 0 40T 0 mpath
└─Veeam_Repo_01p1 253:4 0 36.4T 0 part /BACKUP
sdj 8:144 0 55T 0 disk
└─Veeam_Repo_01 253:3 0 40T 0 mpath
└─Veeam_Repo_01p1 253:4 0 36.4T 0 part /BACKUP

You’ll notice the paths are all showing as 55TB

Note: I had to reboot at this point for the free size to be shown in Parted

parted /dev/mapper/Veeam_Repo_01


GNU Parted 3.2
Using /dev/mapper/Veeam_Repo_01
Welcome to GNU Parted! Type ‘help’ to view a list of commands.
(parted) print free
Warning: Not all of the space available to /dev/mapper/Veeam_Repo_01 appears to be used, you can fix the GPT to use all of the space (an extra 32212254720
blocks) or continue with the current setting?
Fix/Ignore? Fix
Model: Linux device-mapper (multipath) (dm)
Disk /dev/mapper/Veeam_Repo_01: 60.5TB
Sector size (logical/physical): 512B/4096B
Partition Table: gpt
Disk Flags:

Number Start End Size File system Name Flags
17.4kB 1049kB 1031kB Free Space
1 1049kB 40.0TB 40.0TB xfs primary
40.0TB 60.5TB 20.5TB Free Space

Now we can resize partition 1

(parted) resizepart 1


Warning: Partition /dev/mapper/Veeam_Repo_01p1 is being used. Are you sure you want to continue?
Yes/No? Yes
End? [40.0TB]? 60.5TB

(parted) quit

Grow XFS Filesystem

xfs_growfs /dev/mapper/Veeam_Repo_01p1

Confirm new size

findmnt -lo source,target,fstype,used,size -t xfs | grep Veeam


Output

/dev/mapper/Veeam_Repo_01p1 /BACKUP xfs 392.7G 55T

pVLANs and NSX-T VDS Switch Bug

$
0
0

Problem

When attempting to add Primary and Isolated VLANs on an NSX-T (3.1.3) Enabled VDS switch we got the following error:

Unable to set Pvlan Map: Status(bad0004)= Busy

Resolution

There is no resolution at the time of writing but this will be fixed in version 3.2 of NSX-T

Add iSCSI Target with Multipathing in Rocky 8

$
0
0

In this guide I will be setting up a Rocky Linux 8 machine a Veeam Repository – which connects to back end storage (10.9.9.241).

The guide assumes the backup storage and ACLs etc have all been set up.

Install initiator Utilities

dnf -y install iscsi-initiator-utils

Install Mulipathd

dnf -y install device-mapper-multipath

Copy the multipath config

cp /usr/share/doc/device-mapper-multipath/multipath.conf /etc/multipath.conf

Enable multipathd

systemctl --now enable device-mapper-multipath

Set up the multipathing in the initramfs system

dracut --force --add multipath

Edit the iscsi initiator name:

vi /etc/iscsi/initiatorname.iscsi

Change name to eg myhost-01


InitiatorName=iqn.1994-05.com.redhat:myhost-01

Add ISCSI Target

iscsiadm -m discovery -t sendtargets -p 10.9.9.241

Note: If you ever delete an ISCSI Target:

iscsiadm -m discovery -t sendtargets -p 10.9.9.241 -o delete

Log the iscsi into target

iscsiadm -m node --login

Show sessions

iscsiadm -m session -o show

Check mulitpathing

multipath -ll

Output:

mpatha (36d039ea000296cfd000000d8617251f8) dm-3 NETAPP,INF-01-00
size=100T features=’3 queue_if_no_path pg_init_retries 50′ hwhandler=’1 alua’ wp=rw
-+- policy='service-time 0' prio=10 status=active

|- 22:0:0:0 sde 8:64 active ready running

|- 20:0:0:0 sdc 8:32 active ready running

|- 21:0:0:0 sdd 8:48 active ready running

– 23:0:0:0 sdf 8:80 active ready running

Take note of WWID. In this case 36d039ea000296cfd000000d8617251f8)

Edit multipathing config

vi /etc/multipath.conf

Uncomment/Edit – following lines

multipaths {
        multipath {

                path_grouping_policy    multibus

                path_selector           "round-robin 0"
                failback                manual
                rr_weight               priorities
                no_path_retry           5
        }
        multipath {
                wwid                    36d039ea000296cfd000000d8617251f8
                alias                   VEEAM-REP01
        }
}

Restart Multipathd

systemctl restart multipathd

List mulitpaths again

multipath -ll

Output – Note the new name – VEEAM-REP01

mpatha (VEEAM-REP01) dm-3 NETAPP,INF-01-00
size=100T features=’3 queue_if_no_path pg_init_retries 50′ hwhandler=’1 alua’ wp=rw
-+- policy='service-time 0' prio=10 status=active

|- 22:0:0:0 sde 8:64 active ready running

|- 20:0:0:0 sdc 8:32 active ready running

|- 21:0:0:0 sdd 8:48 active ready running

– 23:0:0:0 sdf 8:80 active ready running

Create iSCSI volume with Parted and Format with XFS

$
0
0

This is a follow on from the following post: http://www.jordansphere.co.uk/add-iscsi-target-with-multipathing-in-rocky-8/

In this guide I will be formatting a 100TB XFS volume

List block devices

lsblk

Output

NAME                MAJ:MIN RM   SIZE RO TYPE  MOUNTPOINT
 sda                   8:0    1  29.7G  0 disk
 └─sda1                8:1    1  29.7G  0 part
 sdb                   8:16   0 222.6G  0 disk
 ├─sdb1                8:17   0   600M  0 part  /boot/efi
 ├─sdb2                8:18   0     1G  0 part  /boot
 └─sdb3                8:19   0   221G  0 part
   ├─rl-root         253:0    0   110G  0 lvm   /
   ├─rl-swap         253:1    0     4G  0 lvm   [SWAP]
   └─rl-home         253:2    0   107G  0 lvm   /home
 sdc                   8:32   0   100T  0 disk
 └─VEEAM-REP01 253:3    0   100T  0 mpath
 sdd                   8:48   0   100T  0 disk
 └─VEEAM-REP01 253:3    0   100T  0 mpath
 sde                   8:64   0   100T  0 disk
 └─VEEAM-REP01 253:3    0   100T  0 mpath
 sdf                   8:80   0   100T  0 disk
 └─VEEAM-REP01 253:3    0   100T  0 mpath

Run Parted on volume

parted /dev/mapper/VEEAM-REP01

Label the partition

mklabel GPT

Create XFS filesystem at 100% size

mkpart primary xfs 0% 100%
quit

Make mount point

mkdir /BACKUP

Make XFS filesystem on partition

mkfs.xfs /dev/mapper/Veeam_Repo_01p1

Mount filesystem

mount /dev/mapper/VEEAM-REP01p1 /BACKUP

Edit FSTAB and add following line

vi /etc/fstab
/dev/mapper/VEEAM-REP01p1    /BACKUP xfs     _netdev,x-systemd.requires=iscsi.service        0 0

Note:

_netdev tells fstab this is a network device

x-systemd.requires=iscsi.service confirms the order of startup. This should mean the order is network -> ISCSI -> Mount and then the same in reverse when shutting down.

Add LACP Interface and VLAN via CLI in Windows 2019 Core

$
0
0

In this guide I will show you to create an LACP bond and then a VLAN using this bond as a parent. I will bonding 2 x 25Gb interfaces (VIC-MLOM-eth0 and VIC-MLOM-eth1) which are being passed through via Cisco C220 M5 rackmount blade

In Powershell :

Get-NetAdapter

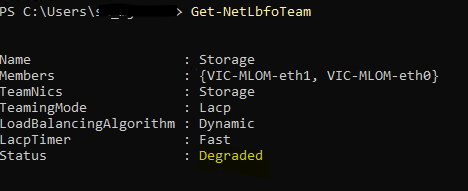
The above shows the two NIC names im interested in. Please only 1 of them is up at the moment so I’m expected to see a degraded LACP state later/

Create the bond (called storage in my case)

New-NetLbfoTeam -Name Storage -TeamMembers VIC-MLOM-eth0,VIC-MLOM-eth1 -TeamingMode LACP

Show LB info

Get-NetLbfoTeam

Use the following command to display the new name

Get-NetIPConfiguration

Create VLAN 419 on Storage interface


Add-NetLbfoTeamNic -Team "Storage" -vlanid 419

Set IP address to VLAN

New-NetIPAddress -IPAddress 10.9.34.196 -PrefixLength 26 -interfacealias "Storage - Vlan 419"

Check the IP has been assigned correctly by

ipconfig

Install Cisco MLOM Drivers to Windows on Cisco UCS C220 M5

$
0
0

Problem: The Windows 2019 Core Server OS was not showing the 4 Ethernet ports (1 Cisco MLOM card)

Solution:

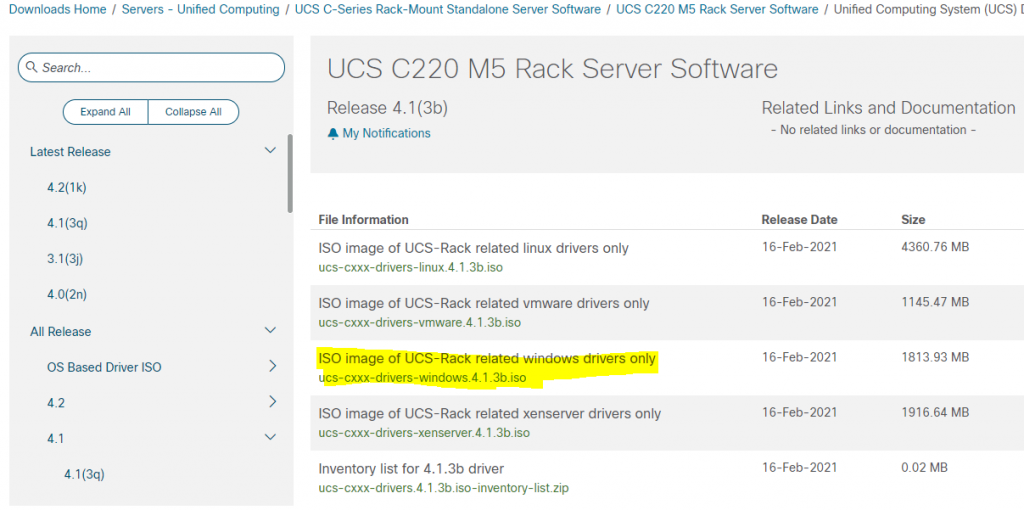
Download drivers from Cisco website:

Mount Drivers on ISO via KVM in CIMC (H:/ drive in my case)

Log into Windows 2019 Core Server and run following:

pnputil -i -a H:\Network\Cisco\VIC\W2K19\NENIC.INF

Remove VLAN and IP configuration in Windows 2019 Core

Change MTU on NIC Adapters in Windows 2019 Core

$
0
0

Problem: I had an issue where I set the NIC, Team and VLAN to be MTU 9000 but I still couldn’t get jumbo frames working on the interfaces.

Solution: There is an extra set step required which involves increasing the MTU on the adapter.

In this example I have 4 port Cisco MLOM card that I need changing to Jumbo Frames.

List adapters in question:

Get-NetAdapterAdvancedProperty -Name VIC-MLOM-eth* -DisplayName "Jumbo Packet" 

Change MTU on all these to 9014

Get-NetAdapterAdvancedProperty -Name VIC-MLOM-eth* -DisplayName "Jumbo Packet" | Set-NetAdapterAdvancedProperty -RegistryValue "9014"

I could then successfully use jumbo frames on these interfaces.

svMotion with Veeam CDP

$
0
0

Problem:

svMotion is not supported with CDP replicas as it creates many extra files that are left behind thus breaking the replication.

Solution:

Currently the only workaround is:

  1. Remove VM from job/policy
  2. Remove replica vm from vsphere
  3. Manually move the files from datastore to datastore
  4. Re-add the vm in vsphere
  5. Re-add the vm in the job/policy and use replica mapping to point to the just re-added vm


Add Gateway to NetAPP SVM

$
0
0

To add a default route to an SVM after creation run the following command:

network route create -vserver [VSERVER] -destination 0.0.0.0/0 -gateway {defaultgw_IP]

eg

network route create -vserver mySVM01-destination 0.0.0.0/0 -gateway 192.168.1.254

DDBoost Account Locked

$
0
0

Problem: Our Veeam backups starting failing with an authentication issue to our Data Domain.

Solution: Upon investigation it appears the DDBoost account was locked. This appears to have been reset to 90 days after a recent upgrade.

1) SSH to Data Domain and log in as sysadmin account

2) Run following command:

user password aging show

As you see it is set to 90 days.

3) To set the DDBoost acocunt to 99999 days use following command

user password aging set DDBOOST max-days-between-change 99999

Make Subordinate Primary UCS

$
0
0

Problem:

After a successful firmware upgrade of a UCSM and Fabric Interconnects (4.0.4 -> 4.1.3), Fabric B continued to be primary. I wanted to fail this back over.

Solution:

To make the Fabric A the primary again, SSH to Fabric B and use the following commands:

connect local-mgmt
cluster lead a

Error: Can’t Have a Partition outside the disk

$
0
0

Problem:

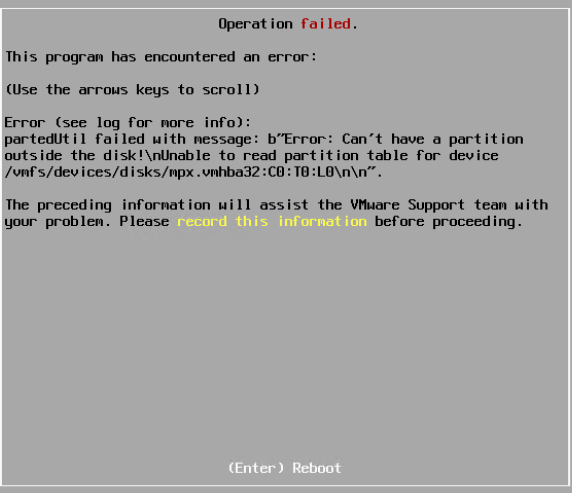
When trying to install ESXi on a new UCS M5 Blade I got the following error

partedUtil failed with message : Error: Can’t have a partition outside the disk!

Resolution

You will need to format the disks – in my case SD cards.

Go to the Blade -> Inventory -> Local Storage -> Select Flex Flash Controller -> Format SD Cards.


Remove Drives from Pool in Netapp E-Series

$
0
0

Problem

I needed to remove a drive from a Pool in a Netapp E5760 in order to be a hot spare

Solution

You need to do this via SMCLI or Run the query from Santricity. As you have to install Santricity for access to SMCLI, I just used the Manager software to run the query.

From Santricity Manager -> {Select the array} -> Tools -> Execute Script

Enter the code:

In this example I am removing Shelf 1, Drawer 1, Disk 0

set diskPool ["MY-pool"]
removeDrives=(1,1,0);

You have the option of “verify, verify and execute or execute” to proceed

Example output:

You can view the progress by going to Home -> Operations in Progress in the GUI

Note: There are some caveats before doing this like required amount of space so please use Netapp guide before proceeding.

You can then repurpose the disk.

Create New vCloud Director Certificates from PFX

$
0
0

Below are the steps to extract all the information required from a PFX file (CompleteCert.pfx) to update the certs in a keystore for Vcloud Director.

Note: In this example the CA has changed so i have changed the Intermediate and Root Certs.

The following steps are carried out from a Centos 7 vcloud director cell

CREATE PRIVATE KEY

openssl pkcs12 -in CompleteCert.pfx -nocerts -out mj_key.pem -nodes

EXPORT CERTS

openssl pkcs12 -in CompleteCert.pfx -nokeys -out mj_cert.pem

WRITE OUT RSA KEY WITHOUT PASSWORD

openssl rsa -in mj_key.pem -out mj.key

EXPORT JUST CERTS

openssl pkcs12 -in CompleteCert.pfx -out mj_just_cert.crt -clcerts -nokeys

EXPORT CA CERTS
Extract the certs from mj_key.pem (mj_root.crt and mj_intermediate.crt) and place into mj_bundle.crt

Note: you can also get these from the CAs website.

EXPORT ALIAS

openssl pkcs12 -export -in mj_just_cert.crt -inkey mj.key -CAfile mj_bundle.crt -name http -out http.pfx -chain

openssl pkcs12 -export -in mj_just_cert.crt -inkey mj.key -CAfile mj_bundle.crt -name consoleproxy -out http.pfx -chain

DELETE OLD ENTRIES FROM KEYSTORE

/opt/vmware/vcloud-director/jre/bin/keytool -storetype JCEKS -keystore mj_certs.ks -delete -alias intermediate

/opt/vmware/vcloud-director/jre/bin/keytool -storetype JCEKS -keystore mj_certs.ks -delete -alias root

/opt/vmware/vcloud-director/jre/bin/keytool -storetype JCEKS -keystore mj_certs.ks -delete -alias consoleproxy

/opt/vmware/vcloud-director/jre/bin/keytool -storetype JCEKS -keystore mj_certs.ks -delete -alias http

CONFIRM KEYSTORE IS EMPTY

/opt/vmware/vcloud-director/jre/bin/keytool -storetype JCEKS -list -v -keystore mj_certs.ks

ADD NEW CRTS TO KEYSTORE

/opt/vmware/vcloud-director/jre/bin/keytool -importkeystore -deststorepass [PASSWORD] -destkeystore mj_certs.ks -deststoretype JCEKS -srckeystore consoleproxy.pfx -srcstoretype PKCS12 -srcstorepass [PASSWORD]

/opt/vmware/vcloud-director/jre/bin/keytool -importkeystore -deststorepass [PASSWORD] -destkeystore mj_certs.ks -deststoretype JCEKS -srckeystore http.pfx -srcstoretype PKCS12 -srcstorepass [PASSWORD]

CONFIRM KEYSTORE HAS ENTRIES

/opt/vmware/vcloud-director/jre/bin/keytool -storetype JCEKS -list -v -keystore mj_certs.ks

ADD INTERMEDIATE AND ROOT CERTS

/opt/vmware/vcloud-director/jre/bin/keytool -storetype JCEKS -keystore mj_certs.ks -importcert -alias root -file mj_root.crt

/opt/vmware/vcloud-director/jre/bin/keytool -storetype JCEKS -keystore mj_certs.ks -importcert -alias intermediate -file mj_intermediate.crt

DFW Blocking Rule when Attempting to Get to Load Balancer IP

$
0
0

Setup:

Under the same Single Segment in NSX-t 3.1.3 I have a VM attempting to get to the LB.

Source VM: 10.1.98.77

Target LB: 10.1.98.72
–Member A: 10.1.98.68
–Member B: 10.1.98.69

Issue:

When trying to connect from source (10.1.98.77) to LB (10.1.98.72) on port 443. If I attempted to lockdown the firewall rule from source IP (10.1.98.77 or even 10.1.98.0/.24) then the connection was not successful. This was very strange as when it was set to ANY then it worked. This means this IP must be changing somewhere along the line. The traceflow in NSX-T showed that it was being blocked on the DFW rule at the final step getting to the member server.

Solution:

The issue was the SNAT Translation in the Load Balacner configuration.

In NSX-T Manager go Networking -> Load Balancing -> Server Pools -> {Edit Pool} -> Set SNAT Translation Mode to IP Pool -> Set IP Address (in this case) to : 10.1.98.72

SMCLI Commands for NetApp E-Series

$
0
0

Issue

I needed to remove a disk from a disk pool on an E-series 5700 (http://www.jordansphere.co.uk/remove-drives-from-pool-in-netapp-e-series/ ). This can only be done via SMCLI – which i’d never used before. Here are few useful steps and commands I found on the way.

Steps

Firstly I needed to install the E-Series Santricity Manager (despite the my E-Series being Web based). I downloaded the latest 11.53 and installed as “management station” mode

Being new to SMCLI I ran a few show commands first to familiarize myself with the process:

Show all volumes on array

SMcli -clientType https {MGMT_IP_OF_SAN} -u admin -p myPassword -c "show allVolumes;" -k

Show disk status in Shelf 1, Drawer 1, Drive 1

SMcli -clientType https {MGMT_IP_OF_SAN} -u admin -p myPassword -c "show drive [1,1,1] summary;" -k

Output:

Performing syntax check…

Syntax check complete.

Executing script…

SUMMARY
Number of drives: 1
Current media type(s): Hard Disk Drive (1)
Current interface type(s): SAS (1)
Drive capabilities: Data Assurance (DA) (1)

BASIC:

  SHELF, DRAWER, BAY  STATUS   CAPACITY   MEDIA TYPE       INTERFACE TYPE  CURRENT DATA RATE  PRODUCT ID       FIRMWARE VERSION  CAPABILITIES
  1,    1,      1     Optimal  10.692 TB  Hard Disk Drive  SAS             12 Gbps            HUH721212AL5204  NE00              DA

DRIVE CHANNELS (Controller A):

  SHELF, DRAWER, BAY  PREFERRED CHANNEL  REDUNDANT CHANNEL
  1,    1,      1     1                  2, 3

Script execution complete.

SMcli completed successfully.

Reboot Loop Limit Exceeded – NetApp E5760

$
0
0

Problem:

When installing (well, remote hands in a datacenter) an NetApp E5760 with DE460C shelf, after the initial configuration of the management IP address the array went into the following state:

Reboot Loop Limit Exceeded

Lockdown code: 0ELF

The storage array has exceeded its reboot limit and has locked down to preserve the data on the storage array. Contact your Technical Support Engineer for assistance correcting this problem

Solution:

PLEASE DO NOT DO THIS WITHOUT NETAPP SUPPORT

We consoled to each controller, logged in using the username eos and password we set up on configuration

Once on the command line we ran the following on both controllers.

spriSevenSegShow

As expected Controller B mentioned the lockdown code of 0ELF

To fix this issue we ran the following command


lemClearLockdown

This resulted in the controllers rebooting several times and cleared the errors.

Viewing all 229 articles
Browse latest View live