Quantcast
Channel: Jordansphere
Viewing all 229 articles
Browse latest View live

Partially Powered Off in vCloud Director

$
0
0

What does Partially Powered Off mean and do you get charged when the VM is in this state?


When you shut down the guest OS from within a VM you may see a Partially Powered Off message like below:


partially_powered_vcd1

In the above sceenshot the command shutdown -h now was used on a CentOS 7 OS CLI.


The VM is actually completely powered off as far as vCenter is concerned so no charges will be applied if using the Pay-As-You-Go model

partially_powered_vcd2


Transfer Failed: The OVF Descriptor is Not Available

$
0
0

Problem: I was trying to upload vRealize Log Insight 4.5.0 OVA via a vCenter Server Appliance 6.5 and was presented with the following error:

Transfer failed: The OVF descriptor is not available.

ovf_install_fail1

Possible fixes:

Try checking the MD5 Sum


Resolution:

I simply re-downloaded the OVA again from the VMware website and it deployed successfully this time,.


Telnet from Cisco UCS

$
0
0

Problem:

Ciscco UCS was not backing up the configuration via SFTP. I wanted to check I could connect to the backup server from the UCS on port 22 (SSH)


Resolution:


Execute the following commands using your desired SSH Client. I have used Putty in this example.

1) SSH to the Cisco UCS and enter your credentials:

# ssh admin@10.64.63.10

2) Change to the local management command mode:

fi-A(local-mgmt)# connect local-mgmt a

3) Issue telnet command:

fi-A(local-mgmt)# telnet 10.65.61.72 22


Zerto: Disk Resized: Volume Resized for VMs

$
0
0

Problem:

Zerto job started failing with error Needs configuration. Reason: Disk Resized: Volume resized for vms: {VMNAME}

zerto_resized_disk1


Resolution:


It appears the VM had its disk increased. I tried to force sync but that did not work so the following steps were taken.

Edit VPG -> VMs > {Remove desired VM from protection}  -> {Select do not preserve disks} -> Done

Edit VPG -> VMs -> {Re-add VM back into protection group} -> Done

Force sync if necessary.


Nessus Scan Showing SSLv3 on NS Client

$
0
0

Problem

During a Nessus scan of a network it was showing lots of insecurities with an NSClient configuarion on a windows machine we were monitoring via Nagios.

OS:           Windows 2016
NSClient:     0.3.x
Nagios:       4.0.7


Looking at one particular issue (SSLv2 and SSLv3) showing on the report:

nessus1

Nessus Output:

The remote service accepts connections encrypted using SSL 2.0 and/or SSL 3.0. These versions of SSL are affected by several cryptographic flaws, including:

- An insecure padding scheme with CBC ciphers.

- Insecure session renegotiation and resumption schemes.

An attacker can exploit these flaws to conduct man-in-the-middle attacks or to decrypt communications between the affected service and clients.

Although SSL/TLS has a secure means for choosing the highest supported version of the protocol (so that these versions will be used only if the client or server support nothing better), many web browsers implement this in an unsafe way that allows an attacker to downgrade a connection (such as in POODLE). Therefore, it is recommended that these protocols be disabled entirely.

NIST has determined that SSL 3.0 is no longer acceptable for secure communications. As of the date of enforcement found in PCI DSS v3.1, any version of SSL will not meet the PCI SSC's definition of 'strong cryptography'.

Solution

Consult the application's documentation to disable SSL 2.0 and 3.0.
Use TLS 1.1 (with approved cipher suites) or higher instead.

See Also

https://www.schneier.com/academic/paperfiles/paper-ssl.pdf
http://www.nessus.org/u?0bb7b67d
http://www.nessus.org/u?247c4540
https://www.openssl.org/~bodo/ssl-poodle.pdf
http://www.nessus.org/u?5d15ba70
https://www.imperialviolet.org/2014/10/14/poodle.html
https://tools.ietf.org/html/rfc7507
https://tools.ietf.org/html/rfc7568

Output
  • - SSLv3 is enabled and the server supports at least one cipher.
    
    Port Hosts
    5666 / tcp

    10.0.200.2


Resolution:

Our Nagios server connects to the NS Client on the Windows machine via 12489. Port 5666 is not required. However NRPE listener was seemingly started by default. As we did not require this port to be listening we just stopped the NRPE service from starting:

1) Open the nsclient/NCSA config file (eg C:\Program Files\NSClient++\NSC) and comment out the NRPEListener.dll like so

[modules]
;NRPEListener.dll
NSClientListener.dll
FileLogger.dll


Note: in later versions of the NSClient you can just disable the SSL values but as we didnt even require NRPE to be listening we simply stopped the service.

New Install of Squid Only Running on IPv6

$
0
0

Problem:

I installed Squid 3.5.20 on a fresh copy of CentOS 7 but the web proxy was not working when I pointed a browser to it.


Troubleshooting:

 I could telnet locally to port 3128 but when I tried from another device on the network I was unable to connect, despite opening the port on the firewall.

Running a netstat command I was able to see that port 3128 was utilizing ipv6 only:

# netstat -an 


Active Internet connections (servers and established)
Proto Recv-Q Send-Q Local Address           Foreign Address         State
tcp        0      0 0.0.0.0:22              0.0.0.0:*               LISTEN
tcp        0      0 127.0.0.1:25            0.0.0.0:*               LISTEN
tcp        0     64 10.64.208.100:22        10.64.214.254:51700     ESTABLISHED
tcp6       0      0 :::22                   :::*                    LISTEN
tcp6       0      0 :::3128                 :::*                    LISTEN
tcp6       0      0 ::1:25                  :::*                    LISTEN
udp        0      0 0.0.0.0:45496           0.0.0.0:*
udp        0      0 127.0.0.1:323           0.0.0.0:*
udp6       0      0 :::33526                :::*
udp6       0      0 ::1:323                 :::*
raw6       0      0 :::58                   :::*                    7


Resolution:

Edit squid.conf and change the http_port 3128 to http_port 0.0.0.0:3128

 # vi /etc/squid/squid.conf

eg

#http_port 3128
http_port 0.0.0.0:3128

SMB Signing Disabled

$
0
0

Problem:

On a Nessus PCI Scan SMB Signing Disabled was flagged up as a vulnerability.


Nessus Output:

Description

Signing is not required on the remote SMB server. An unauthenticated, remote attacker can exploit this to conduct man-in-the-middle attacks against the SMB server.

Solution

Enforce message signing in the host's configuration. On Windows, this is found in the policy setting 'Microsoft network server: Digitally sign communications (always)'. On Samba, the setting is called 'server signing'. See the 'see also' links for further details.


Resolution:

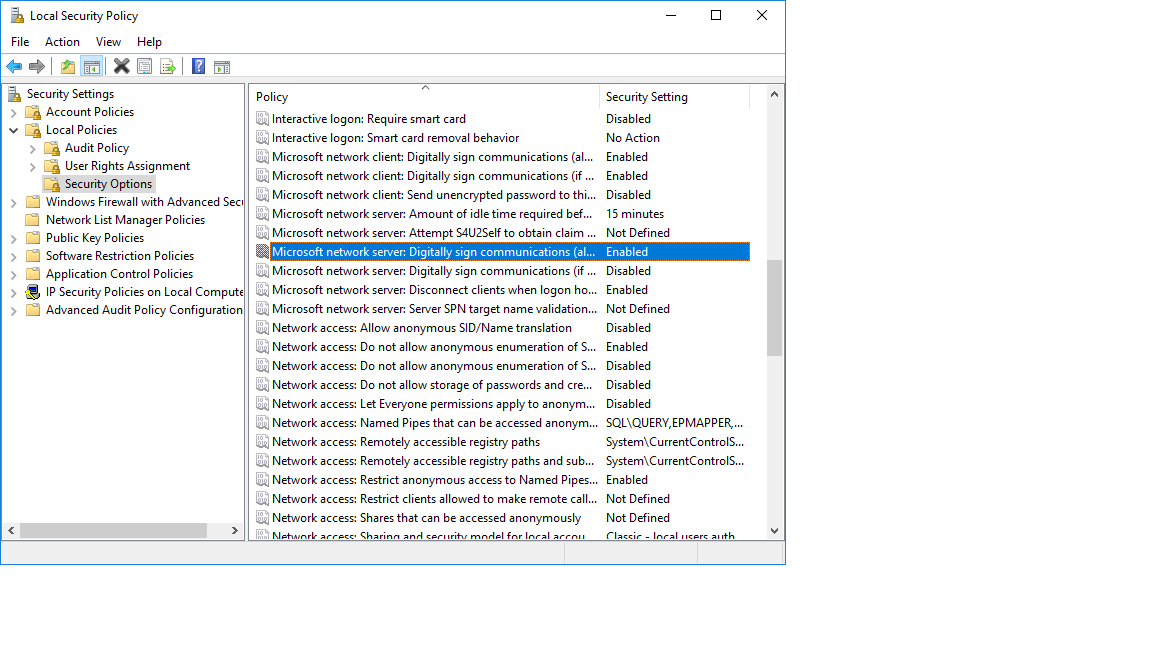
On the affected server. Open Administrative Tools -> Local Security Policy -> Local Policies  > Security Options 

Enable the following Policies:

Microsoft network client: Digitally sign communications (always)
Microsoft network server:  Digitally sign communications (always)


smb_digitally_sign1

Restart VCSA 6.5 Services via CLI Commands

$
0
0

First of all you will need to connect to the VSCA CLI by SSH. Then type shell on the command line:

Command> shell

To list all services and their state:

# service-control --status --all

Example output:


cli1


To start a service:

# service-control --start --{service-name}


In this example I am starting the vpxd service

cli3


To stop a service:

# service-control --stop --{service-name}


To stop all services:

# service-control --stop --all


Backup Cisco Firepower Management Center (FMC)

$
0
0


In this example I will back up the Firepower Management Center. All policies and rules are configured and sent via the FMC so backing up the configuration will mean that sensors can be restored via the FMC – if one ever crashes. Alternatively the sensors will continue to work if there is a problem with the FMC.


 Log in to the Firepower Management Center. Select System -> Tools -> Backup/Restore

backup_firepower_mgmt1


Click Firepower Management Backup -> {Enter a backup Name} -> Start Backup


backup_firepower_mgmt2

Upgrade Firepower Management Center (FMC)

$
0
0

In this example we will be upgrading Firepower Management Center virtual appliance (formerly known as Firesight) from version 6.0.1.3 to 6.1.0-33.  This process needs to take place before the Firepower sensors are upgraded.


Pre-Reqs

Ensure you have backups of the FMC. As its virtual I'd also recommend taking a snapshot as well.


Check the upgrade path on the Cisco website

firepower_upgradepath


Run in the pre-installation (optional but recommended) package


Ref: https://www.cisco.com/c/en/us/td/docs/security/firepower/610/relnotes/Firepower_System_Release_Notes_Pre_Installation_Package_Version_610.html#35807


Download the pre-installation package (Sourcefire_3D_Defense_Center_S3_Pre-install-6.0.1.999-1252.sh) from Cisco website.

Upload the update to the FMC:   

System -> Updates -> Product Updates -> Upload Update -> {Browse download} -> Upload

firepower_preinstall1


Ensure all devices are communicating correctly and there are no running tasks

System -> Health -> Monitor

firepower_preinstall2


Install Pre-Install package

System -> Updates -> {Install Icon}

Note: No reboot is required.


Upload upgrade package & run readiness check

Download update (in this case: Sourcefire_3D_Defense_Center_S3_Upgrade-6.1.0-330.sh )  from Cisco website then upload to the appliance. (like in steps above)

SSH to appliance and run following commands:

Syntax:

sudo install_update.pl --readiness-check /var/sf/updates/{filename}

Command to run in our example:

sudo install_update.pl --readiness-check /var/sf/updates/Sourcefire_3D_Defense_Center_S3_Upgrade-6.1.0-330.sh


(you will be prompted for password}

preinstall_fmc1


Monitor progress and confirm process completes successfully.


Upgrade FMC

Click the install icon:

install_fmc1


Confirm install

install_fmc2


You can see the status of the install :

install_fmc3

Eventually you will be logged out. If you decide to log back in you can see the status of the update:

install_fmc4

Finally the appliance will reboot:

firepower_post_install


You should then be able to connect back into your appliance and check the status of the update.

Check Uptime on Windows Server

$
0
0

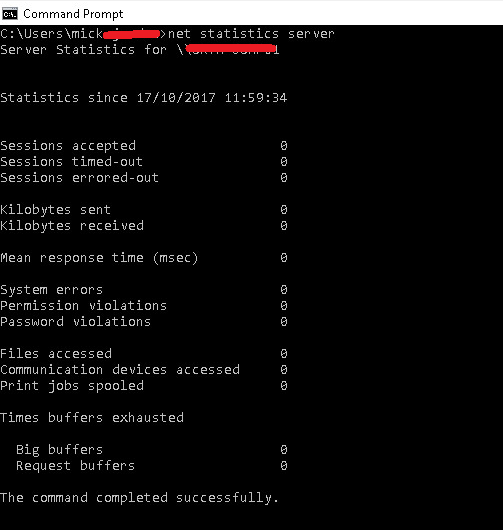
To find the uptime on a windows server

Open a command prompt

Start -> run -> Cmd

Then type:


net statistics server


Find Statistics since line:

 net-sat-server1

This tells you when the server was last rebooted.

Retrospectively Check which VMs Migrated during HA Failover

$
0
0

Issue:

An ESXi server crashed invoking HA. I wanted to check which VMs had restarted and on what host so I could check they were functioning correctly.


Resolution:

Thanks to my colleague for the following PowerCLI script:

PowerCLI C:\> Connect-VIServer -Server {your_vcenter} -User {your_username} -Password {your_password}

PowerCLI C:\> $Date = Get-Date

PowerCLI C:\> $HAVMrestartold =5

PowerCLI C:\> Get-VIEvent -maxsamples 100000 -Start ($Date).AddDays(-$HAVMrestartold) -type warning | Where {$_.FullFormattedMessage -match "restarted"} |select CreatedTime,FullFormattedMessage |sort CreatedTime -Descending


Output:

CreatedTime         FullFormattedMessage
———–         ——————–
23/10/2017 01:27:19 vSphere HA restarted virtual machine win-sql-11 (xxxxxx) on host esx50.jordansphere.co.uk in cluster cl01
23/10/2017 01:26:38 vSphere HA restarted virtual machine win-sql-13 (xxxxxx) on host esx64.jordansphere.co.uk in cluster cl01
23/10/2017 01:25:02 vSphere HA restarted virtual machine ubuntu-02 (xxxxxx) on host esx48.jordansphere.co.uk in cluster cl01
23/10/2017 01:24:53 vSphere HA restarted virtual machine backend-SQL-01 (xxxxxxx) on host esx69.jordansphere.co.uk in cluster cl01
23/10/2017 01:24:53 vSphere HA restarted virtual machine backend-sql-02 (xxxxxxx) on host esx52.jordansphere.co.uk in cluster cl01
23/10/2017 01:24:53 vSphere HA restarted virtual machine mobile03 (xxxxxxx) on host esx70.jordansphere.co.uk in cluster cl01

Lockdown NSX Edge SSL VPN to Specific IP Address

$
0
0

Issue:

I wanted to lock down my NSX Edge Gateway SSL VPN portal to a specific IP range. As you are not allowed to put a custom rule above a system defined rule on the edge itself I needed a work around.


Resolution:

In vCenter web client go to HOME -> Network & Security -> Firewall -> Add rule {Green + sign)

Add an accept (SSL_VPN_EDGE) and deny (SSL_VPN_EDGE_BLOCK) rule – as highlighed in the screenshot below:

ssl_vpn_edge3

Note; Ensure this is applied to the Edge only

Then go back you NSX Edge:

Go to HOME -> Network & Security -> NSX Edges -> {Select Edge in question} -> Firewall

You'll now see the the rules applied above the system rules

ssl_vpn_edge2


Split SSO Server in vSphere 5.5

$
0
0

Problem:

Our current setup involved several vCenter 5.5 Servers poining to a single SSO server. A requirement arose which required each vCenter to point to its own SSO server.


sso_migration1

Current SSO Server:   sso01.jordansphere.co.uk (10.0.0.1)
New SSO Server:        sso02.jordansphere.co.uk (10.0.0.2)
vCenter Server:           vCenter.jordansphere.co.uk (10.0.0.10)
vCenter Server:           vCenter2.jordansphere.co.uk (10.0.0.20)
Vcenter SQL Server:   sql01.jordansphere.co.uk (10.0.0.30)


The following steps show how to move the vCenter (vcenter2.jordansphere.co.uk) and relevant services to point to the new SSO server (sso02.jordansphere.co.uk). The information has been extracted into a watered down, simple guide from VMware KBs 2127992 & 2033620 . The following steps assume the defaults were chosen when installing vCenter (eg default install directory).


Preinstallation

  1. Take snapshot of vCenter server (vCenter2.jordansphere.co.uk )
  2. Take snapshot of SSO server (sso01.jordansphere.co.uk ) 

Extra precaution:

  1. Backup vCenter DB


1. Document the existing VMware vCenter Single Sign-On permissions used within your VMware vCenter Single Sign-On domain

  1. Identity Sources
  2. Password Policies
  3. Lockout Policies
  4. Token Policies
  5. Single Sign-On Users and Groups added after install


2. Deploy a new VMware vCenter Single Sign-On machine

Deploy new Windows Server from template. Ensure VM has FQDN and DNS resolution.

Mount installer and install SSO

When prompted, create a new VMware vCenter Single Sign-On domain. Do not join another VMware vCenter Single Sign-On domain or instance


3. Repoint Web Client to new SSO Server

Log on as an administrative user to the VMware vCenter Server machine.

To register the vSphere Web Client with a different vCenter Single Sign-On Lookup Service:

Open a command prompt.

Change directory to:

cd C:\Program Files\VMware\Infrastructure\vSphereWebClient\scripts

Run the client-repoint.bat command to register the vSphere Web Client with a different vCenter Single Sign-On and Lookup Service:

client-repoint.bat lookup_service_url "single_sign_on_admin_user" "single_sign_on_admin_password"

For vCenter Server 5.5:

client-repoint.bat https://sso02.jordansphere.co.uk:7444/lookupservice/sdk "administrator@vSphere.local" "MyP@55word"

In this example, 7444 is the default HTTPS port number for vCenter Single Sign-On. If you use a custom port, replace the port number in the example with the port number you use. The quotation marks are required to escape special characters in the Single Sign-On user name and password.


4. To re-register the Inventory Service with vCenter Single Sign-On

Open a command prompt on the Inventory Service host machine and change directory to:


cd C:\Program Files\VMware\Infrastructure\Inventory Service\scripts


Run the is-change-sso.bat command to update the stored configuration information of the Inventory Service:


is-change-sso.bat ssoServerUrl "ssoAdminuser" "ssoAdminPassword"


In vCenter Server 5.5:

is-change-sso.bat https://sso02.jordansphere.co.uk:7444/lookupservice/sdk "administrator@vSphere.local" "MyP@55word"

In this example, 7444 is the default HTTPS port number for vCenter Single Sign-On. If you use a custom port, replace the port number in the example with the port number you use. The quotation marks are required to escape special characters in the Single Sign-On user name and password.


Restart the Inventory Service:

net stop vimQueryService
net start vimQueryService

The vCenter Inventory Service URL configuration is now updated and the Inventory Service is re-registered with vCenter Single Sign-On.


5. Repoint VMware vCenter Server to the new VMware vCenter Single Sign-On deployment

Open a command prompt on the vCenter Server host machine as administrator.

Change directory to:

cd C:\Program Files\VMware\Infrastructure\VirtualCenter Server\ssoregtool

Unzip the sso_svccfg.zip file the change directory

cd C:\Program Files\VMware\Infrastructure\VirtualCenter Server\ssoregtool\sso_svccfg


Run this command to register vCenter Server to a different Single Sign-On instance:

repoint.cmd configure-vc –lookup-server lookup_service_url –user single_sign_on_admin_user –password single_sign_on_admin_password –openssl-path "path_to_OpenSSL_bin_directory/"


The openssl-path path must be enclosed in quotation marks and followed by a trailing forward slash. The openssl-path parameter is required to update the trust store with the new Lookup Service and Single Sign-On certificates. If you do not provide it, the command is executed successfully, but you must manually update the certificate trust store. For more information about updating the certificate trust store for vCenter Server components, see Implementing CA signed SSL certificates with vSphere 5.1 (2034833).

In vCenter Server 5.5:

repoint.cmd configure-vc –lookup-server https://sso02.jordansphere.co.uk:7444/lookupservice/sdk –user "administrator@vSphere.local" –password "MyP@55word" –openssl-path "C:\Program Files\VMware\Infrastructure\Inventory Service\bin/"

In this example, 7444 is the default HTTPS port number for vCenter Single Sign-On. If you use a custom port, replace the port number in the example with the port number you use. The quotation marks are required to escape special characters in the Single Sign-On user name and password.


Restart the VMware VirtualCenter Server and the VMware VirtualCenter Management Webservices services:

  • In the Administrative Tools control panel, click Services.
  • Right-click VMware VirtualCenter Server and click Restart.
  • Right-click VMware VirtualCenter Management Webservices and click Restart.


NSX Edge VPN Not Working after Upgrade from 6.2.4 to 6.3.4

$
0
0

Problem: 


After an upgrade of NSX from 6.2.4 to 6.3.4 in a vCloud enivronment (8.20) several VPNs refused to connect from NSX Edges to a variety of external devices.


Troubleshooting:


We attempted disabling/re-enabling VPN, redploying the Edge (and thus upgrading to 6.3.4) and removing/add the VPN configuration. All failed.

Looking at the backend NSX Manager.

Web client -> Home -> Network & Security -> NSX Edges -> {Select NSX Edge} -> IP Sec VPN -> Show IPsec Statistics


The following error displayed:


sending notification
NO_PROPOSAL_CHOSEN to {IP_address} 500, Oakley Transform 
[OAKLEY_AES_CBC (256), OAKLEY_SHA1, OAKLEY_GROUP_MODP1024] 
refused due to strict flag, no acceptable Oakley Transform, 
responding to Main Mode


oakley_error2


Resolution:

Edit the VPN configuration via NSX Manager (by selecting the pencil icon) -> Change the Diffie-Hellman Group from DH14 to DH2

oakley_error3


It appears during the upgrade VMware have changed the default DH group to 14 which broke several VPN connections


Note; This can also now be changed via vCloud Director Tenant Portal – as seen below:

oakley_error4


vCenter 5.5 – You Do Not Have Permissions to Login to Server

$
0
0

Issue:

I installed a new enivornment with vCenter (yes, its 2017 but  I needed to do some testing). I added my domain to the SSO identity source. However when I went to login I got the following error:

You do not have permissions to login to server: {vcenter-name}

 vsphere_client_failed3


Resolution:

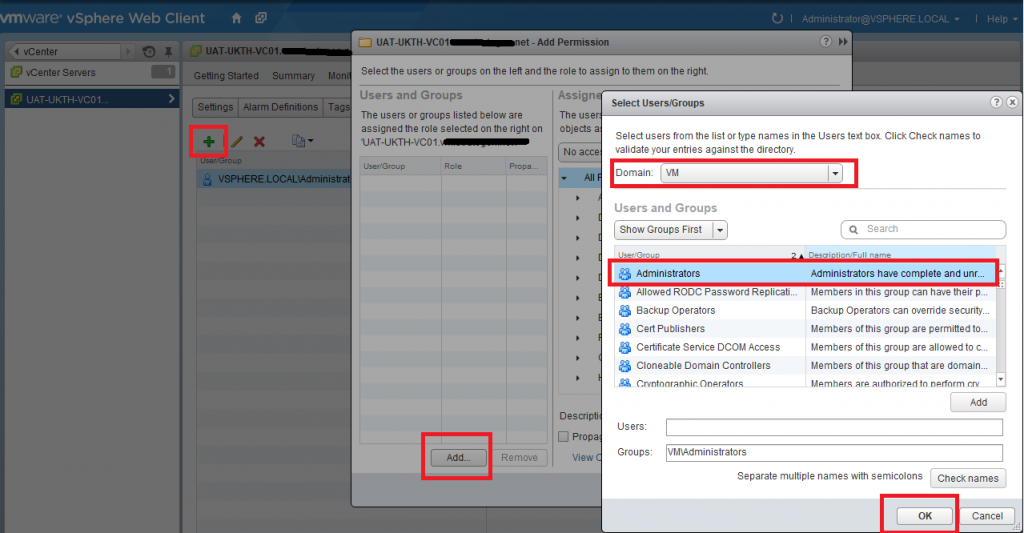
You will also need to add permissions to the users/groups at vCenter level.

Go to Home -> vCenter -> {Select vCenter} ->  Manage -> Permissions -> {+} 

Enter person or group in Users and Groups

Change Assigned Role to your desired role (eg Administrator)

Ok -> Ok

vsphere_client_failed4


You should now be able to login successfully. 

Upgrade NSX 6.2.4 to 6.3.4 in a vCloud Environment

$
0
0

This document describes how to upgrade NSX in a VCD environment. We will be upgrading NSX from 6.2.4 -> 6.3.4

Current Components

Component Version
vCloud Director 8.20.0
ESXi 5.5 U3
vCenter 5.5 U3
NSX 6.2.4
Chargeback Manager 2.7.3


Check Interoperability Matrices

nsx_inter_pod4


Pre-installation

  1. Take a clone of  NSX Manager 
  2. Take backup of NSX manager configuration via GUI.
  3. Set DRS to Manual on target cluster(s)
  4. Disable HA on cluster(s)

       Extra precaution:

  1. Take snapshot of vCenter
  2. Backup vCenter DB


Shutdown vCD service(s)

  1. Log into each cell
  2. Stop VCD service
# service vmware-vcd stop
  1. Check service is shut down
# service vmware-vcd status


Upgrade NSX Manager

  1. Download NSX Manager 6.3.4 Upgrade Bundle from the VMware website


  1. Log into NSX Manager -> Upgrade button -> Upgrade {Upload the Upgrade Bundle) -> Install


The NSX Manager should restart with new version


  1. Check the vSphere web client shows the NSX Manager & correct version. If not restart the vSphere Web Client via the Services option from vCenter server


Upgrade NSX Controllers

  1. In the vSphere Web Client -> Home -> Network and Security -> Installation -> Management. Click the “Upgrade Available“ under the Controller Cluster Status -> Yes


Check controllers have installed successfully


Update ESXi Hosts

  1. In the vSphere Web Client -> Home -> Network and Security -> Installation -> Host Preparation.
  2. Select Upgrade available -> yes. Reboot each host one at a time.
  1. Disable host in VCD
  2. Put host into maintenance mode
  3. Reboot host
  4. Exit maintenance mode
  5. Enable host in VCD

Note: Check each host one at time by moving a VM and NSX edge


Start VCD Service(s)


When the controllers have installed correctly

1.Log into each cell

2. Stop VCD service

# service vmware-vcd start

3. Check service has started

# service vmware-vcd status


Post-install Tasks


  1. Check all services are running (on VCD)
  2. Provision VM
  3. Reploy Edge
  4. Move VM and Edges to each host.
  5. Alter a VDC network
  6. Remove snapshot
  7. Delete clone
  8. Set DRS to automatic
  9. Set HA to enabled

Renew SSL Certificates in vCloud Director

$
0
0

Firstly you wil need to renew your certificates via your chosen CA. I will not delve into the instructions in the post but essentially you will need to create a .csr (my.csr) using a private key (myprivate.key) and password. 

You should receive the root & intermediate files along with the certificate (my.crt). Copy these to the /home directory

1) Copy keystore for editing

# cp /etc/certificates.ks /home/certificate.ks


2) Create wildcard certificates

# openssl pkcs12 -export -in my.crt -inkey myprivate.key -name http -passout pass:{certificate password} -out http.pfx
# openssl pkcs12 -export -in my.crt -inkey myprivate.key -name consoleproxy -passout pass:{certificate password} -out consoleproxy.pfx


3) Import CA Chain

# /opt/vmware/vcloud-director/jre/bin/keytool -storetype JCEKS -keystore /home/certificate.ks -importcert -alias root -file root.cer
# /opt/vmware/vcloud-director/jre/bin/keytool -storetype JCEKS -keystore /home/certificate.ks -importcert -alias intermediate -file intermediate.cer


4) Import end user certificates into keystore

# /opt/vmware/vcloud-director/jre/bin/keytool -importkeystore -srckeystore http.pfx -srcstoretype PKCS12 -destkeystore /home/certificate.ks -deststoretype JCEKS -deststorepass {keystore password} -srcalias http -destalias http 
# /opt/vmware/vcloud-director/jre/bin/keytool -importkeystore -srckeystore consoleproxy.pfx -srcstoretype PKCS12 -destkeystore /home/certificate.ks -deststoretype JCEKS -deststorepass {keystore password} -srcalias consoleproxy -destalias consoleproxy

Note: you should get an option to overwrite current certificates


5) Check certificates in keystore

# /opt/vmware/vcloud-director/jre/bin/keytool -storetype JCEKS -list -v -keystore /home/certificate.ks


6) Copy keystore back to original location

# cp /home/certificate.ks /etc/certificates.ks


7) Shutdown cell

# /opt/vmware/vcloud-director/bin/cell-management-tool cell -u administrator --shutdown


8) Re-configure VCD cell & start VCD process

# /opt/vmware/vcloud-director/bin/configure

OUTPUT:


Welcome to the vCloud Director configuration utility.

You will be prompted to enter a number of parameters that are necessary to
configure and start the vCloud Director service.
The HTTP service and remote console proxy IP addresses have already been set, skipping.
Connecting to the database: jdbc:oracle:thin:@10.10.0.1:1521/XE
DB credentials read successfully.
…\
Database configuration complete.
vCloud Director configuration is now complete.
Once the vCloud Director server has been started you will be able to
access the first-time setup wizard at this URL:
        https://vcd01.jordansphere.co.uk


Would you like to start the vCloud Director service now? If you choose not
to start it now, you can manually start it at any time using this command:
service vmware-vcd start


Start it now? [y/n] y


Starting vmware-vcd-watchdog:                              [  OK  ]
Starting vmware-vcd-cell                                   [  OK  ]
The vCD service will be started automatically on boot.  To disable this,
use the following command: chkconfig –del vmware-vcd

10) Copy /home/certificate.ks to other cell and follow same process from 6) downwards

Create NFS Share in CentOS

$
0
0

This document describes the process of creating an NFS share on a fresh install of CentOS 6. I will be sharing the directory /home/share for use in a test vCloud Director environnment. I will have two servers connecting to the NFS share (10.64.51.61 and 10.64.51.62)


Firstly its always wise to run an update after a fresh install

yum update

We will need ti install NFS and utilites

yum install nfs-utils

Start the NFS service

service nfs start

Start the RPC Bind service

service rpcbind start

Configure NFS to start on boot

 chkconfig nfs on

Configure RPC Bind service to start on boot

 chkconfig rpcbind on


Create directory you would like to share

mkdir -p /home/share

Edit the exports file

vi /etc/exports

Add the following two hosts (with relevant permissions):

/home/share/ 10.64.51.61(rw,no_root_squash)
/home/share/ 10.64.51.62(rw,no_root_squash)

Option:

You may need to open appropriate firewall rules for NFS

Transfer Spooling Area is not Writable in vCloud Director

$
0
0

Issue:

During a new install of vCloud Director 8.20 on Centos 6.9 the service failed to start properly for the first time. 


Troubleshooting:

I investigated log files

# tail -f /opt/vmware/vcloud-director/logs/cell.log

Output:

Application Initialization: 'com.vmware.vcloud.common.core' 100% complete. Subsystem 'com.vmware.vcloud.ui-vcloud-webapp' started
Application Initialization: 'com.vmware.vcloud.common.core' complete. Server is ready in 1:05 (minutes:seconds)
Successfully handled all queued events.
Error starting application: Transfer spooling area is not writable: /opt/vmware/vcloud-director/data/transfer

I had created an NFS share on another file server before installation so I investigated the properties of the transfer directory

# cd /opt/vmware/vcloud-director/data/
# ls -l

Output:

total 12
drwx——. 3 vcloud vcloud 4096 Nov 16 12:53 activemq
drwxr-x—. 2 vcloud vcloud 4096 Oct 12 09:01 generated-bundles
drwxr-xr-x. 2 root   root   4096 Nov 16 11:23 transfer

the vcloud user and group need permissions on this directory

I tried 

# chown vcloud:vcloud transfer/

but this only changed the permissions to nobody:nobody

Resolution:

You will need to change the domain at both NFS server and NFS client side

On NFS client machine

# vi /etc/idmapd.conf


Change Domain to your desired domain (eg jordansphere.co.uk)

[General]
#Verbosity = 0
# The following should be set to the local NFSv4 domain name
# The default is the host's DNS domain name.
Domain = jordansphere.co.uk

Restart the NFS Service

# service nfs restart

Repeat this on the NFS Server

Viewing all 229 articles
Browse latest View live